Riverpod Pagination: The Ultimate Guide for Flutter Developers

Dinko Marinac
Introduction
Since the inception of social media, one key feature seems to be the driving force of usage: the feed. We have all seen it, used and abused it. The key technical concept making this feature possible is called pagination.
What is pagination and why do we use it?
Imagine that your data is a book. Usually, you can only see 1 or 2 pages, the one that you are reading and maybe the one that you will read the next. Pagination is the same concept applied to data.
When the database is preparing the data for you, often times there are very complex queries being executed that pull a lot of data from the database at once. Very often, you are not the only person requesting this from the same database. Pagination is used to make this task much easier for the database for handle.
If you think about it, the screen space you have on any device is limited, so it doesn’t make sense to try to get all the data at once, but instead, only the data that you can see and access.
Having lots of data usually also means that users usually want to find something. Searching and filtering are usually assumed as default features nowadays. They are coupled with pagination because even when filters are applied, there is still too much data to handle and display at once.
If you have ever created a complex app, you have encountered pagination at some point. This article is your go-to guide on how to implement pagination in your app using Riverpod as your state management.
The article is divided into 2 main parts: pagination and searching/filtering. The pagination is adapted from my original article: Implementing Infinite Scroll with Riverpod’s AsyncNotifier, and searching and filtering are an extension of that implementation.
If you read to the end, there is a little bonus tip.
Let’s begin.
Note: This article is intended to be used as a resource. Read it, apply it, re-read and re-apply until you have an implementation that fits your use case the best.
The complete code example for this tutorial can be found on Github.
Pagination
I recently had a task for a client on a project which uses Riverpod for state management: Create an infinite scroll that can be very easily reused.
You might be tempted to answer: “there’s a package for that”.
You would be right, the most notable one is riverpod_infinite_scroll. However, it has not been updated for 16 months and uses a StateNotifier, which will be deprecated and requires additional setup to work with API calls.
Other solutions also rely on a rigid paging structure and go off the assumption that pages are always numbers, which is mostly true for the endpoints you consume but might be false for the UI. An example would be a banking app that displays transactions daily, weekly, or monthly. In that case, the page might not be an int, it might be a DateTime or a String.
Riverpod introduced AsyncNotifier into its catalog to simplify the most common use-case: async loading of the data. I will show you how you can take advantage of that and learn how to abstract pagination which can be reused within the app.
Architecture Diagram
Our pagination implementation will require different moving parts. Here’s a diagram showing how everything fits together:
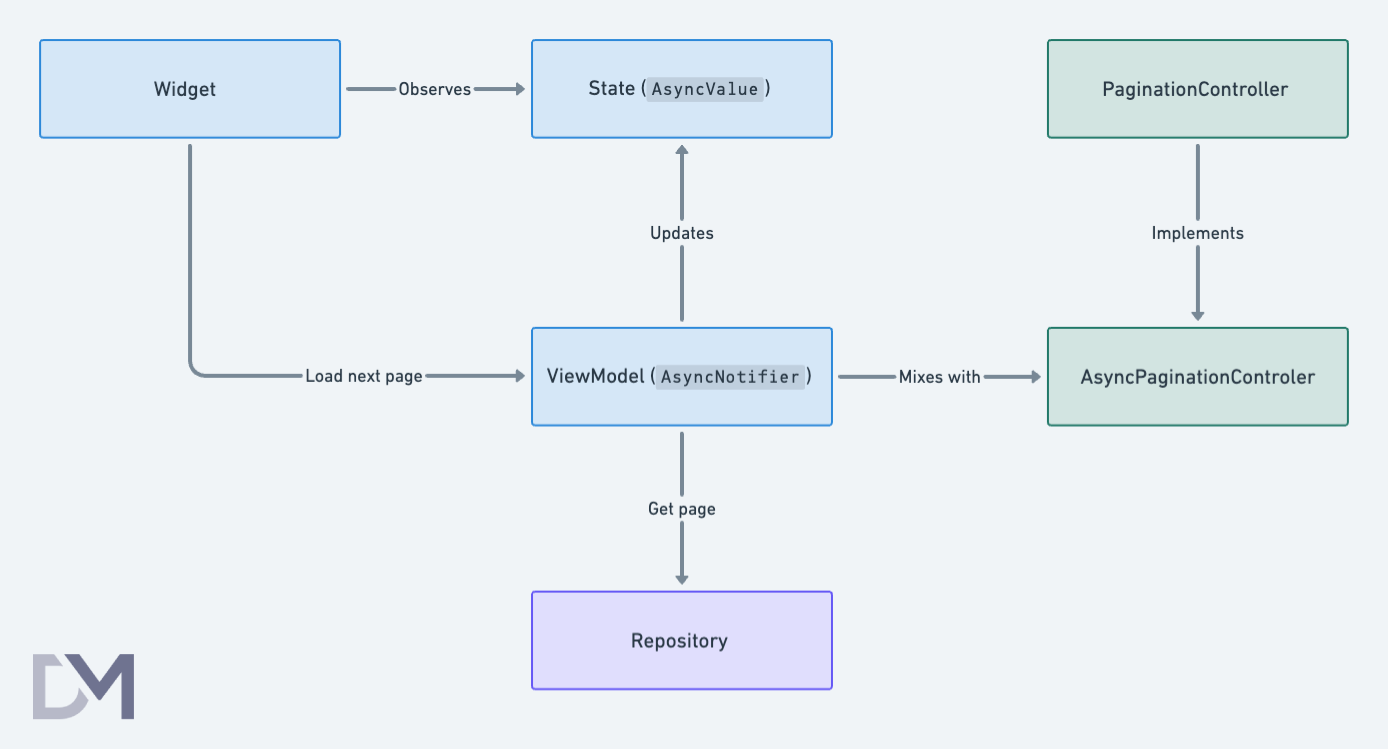
I’m working with MVVM architecture and Repo pattern. If you are not familiar with them, please try to get a basic understanding of them before proceeding further. Everything will become clear as you read along.
I like to start from the data layer and move up to the UI layer.
Data Layer
A common question people ask about pagination is:
“How do I design the class that holds my state to keep track of the page I’m currently on, while simultaneously holding all the data?”
The answer is that you don’t need the state class here. The UI doesn’t need the information about which page is being loaded or how it is being done. The more of this logic is abstracted, the better.
Let’s start by defining what the class that takes care of pagination needs to have. Every paginated response has 2 important variables: page and pageSize. We can ignore the page size since it can be static.
We also need to know what endpoint to call and when to load the next page. Additionally, if there is a need for non-integer paging, we have to know what is the initial value and how to compute the next value.
The result is the following interface:
abstract class PaginationController<T, I> {
  I get initialPage;

  late I currentPage = initialPage;

  FutureOr<List<T>> loadPage(I page);

  Future<void> loadNextPage();

  I nextPage(I currentPage);
}
The interface takes in 2 generic parameters:
-
<T>, which represents the type of data we are returning -
<I>, which represent the type of index we use for pages.
We are operating with 2 values:
-
initialPage, which will be the initial page we want to load -
currentPage, which is used to keep track of what page we are currently on
There are also 3 methods here:
-
loadPage()is used to describe how to fetch a new page -
nextPage()is used to calculate a new page index before fetching -
loadNextPage()is used from the UI when the user scrolls to the end
How to connect this with AsyncNotifier? The answer is using a mixin, which enables every notifier to adopt this interface without inheritance. Composition is favored over inheritance here because inheritance creates strictly defined rules for a class, which is not mandatory.
mixin AsyncPaginationController<T, I> on AsyncNotifier<List<T>> implements PaginationController<T, I> {
  @override
  late I currentPage = initialPage;

  @override
  FutureOr<List<T>> build() async => loadPage(initialPage);

  @override
  Future<void> loadNextPage() async {
    state = AsyncLoading<List<T>>();

    final newState = await AsyncValue.guard<List<T>>(() async {
      currentPage = nextPage(currentPage);
      final elements = await loadPage(currentPage);
      return [...?state.valueOrNull, ...elements];
    });
    state = newState;
  }
}
Spread operator (
…) is used to get the elements from the list. Sincestate.valueOrNullcan be there is also an optional spread operator (…?) which returns the elements of the list only if the list is not null.
This mixin makes sure currentPage is tracked, the initialPage is loaded and the loadNextPage() appends new page elements, so the only thing left is to define the initial page, how to load the page, and how to calculate the next page index.
An example of an AsyncNotifier using this will look like (I’m using the MVVM architecture here
class RepositoriesViewModel extends AsyncNotifier<List<Repository>>
    with AsyncPaginationController<Repository, int> {
  late final repository = ref.read(githubRepositoryProvider);

  @override
  int get initialPage => 1;

  @override
  FutureOr<List<Repository>> loadPage(int page) async {
    final (totalItems, items) = await repository.fetchRepositories(page: page);
    return items;
  }

  @override
  int nextPage(int currentPage) => currentPage + 1;
}
UI Layer
Now that the data layer is taken care of, it’s the UI layer’s turn. With an AsyncNotifier designed like this, the only thing the UI needs to do is call the loadNextPage() method once the scroll is detected.
There are 2 ways you can approach detecting the end of the scroll behavior in a ListView, by a ScrollController or by using a NotificationListener widget. I have chosen the NotificationListener since it has much less code and less code means less maintenance.
The following example demonstrates the implementation:
override
Widget build(BuildContext context) {
	ref.listen(repositoriesViewModelProvider, (_, state) {
		if (!state.isLoading && state.hasError) {
      context.showErrorSnackBar(state.dioException.errorMessage);
    }
	});
  final repositoriesState = ref.watch(repositoriesViewModelProvider);

  return Scaffold(
    body: Padding(
      padding: const EdgeInsets.only(left: 16, right: 16, top: 16),
      child: NotificationListener(
        onNotification: (ScrollNotification scrollInfo) {
          if (scrollInfo is ScrollEndNotification &&
              scrollInfo.metrics.axisDirection == AxisDirection.down &&
              scrollInfo.metrics.pixels >= scrollInfo.metrics.maxScrollExtent) {
            if (viewModel.canLoadMore) {
              viewModel.loadNextPage();
            }
          }
          return true;
        },
        child: CustomScrollView(
          slivers: [
            ...repositories(context, repositoriesState),
          ],
        ),
      ),
    ),
  );
}

List<Widget> repositories(
      BuildContext context, AsyncValue<List<Repository>> repositoryState) {
    final repositories = repositoryState.valueOrNull ?? [];
    final initialLoading = repositoryState.isLoading && repositories.isEmpty;
    final loadingMore = repositoryState.isLoading && repositories.isNotEmpty;

    return initialLoading
        ? shimmerLoading()
        : repositories.isEmpty
            ? [const SliverEmptySearch(text: "No repositories found")]
            : [
                SliverList(
                  delegate: SliverChildBuilderDelegate(
                    (context, index) =>
                        RepositoryItem(repository: repositories[index]),
                    childCount: repositories.length,
                  ),
                ),
                if (loadingMore) const SliverLoadingSpinner(),
              ];
  }
NotificationListener widget exposes a callback which gives you a ScrollNotification object. To be able to load the next page, the user must swipe up from the bottom of the list and there has to be more items available.
To determine if the swiped from the bottom of the screen the following must be true:
-
scrollInfo is ScrollEndNotification: The user has scrolled from the end of the screen -
scrollInfo.metrics.axisDirection == AxisDirection.down: The user has scrolled up -
scrollInfo.metrics.pixels >= scrollInfo.metrics.maxScrollExtent: The size of the scroll is maximal.
If you are wondering why
AxisDirectionis down ↓ and not up ↑ for scrolling up, read this Github issue.
The repositories helper method returns a list of Wigets (Slivers in this case) because we need to show the loading indicator after the list itself while the new page is being loaded. During initial loading, shimmers will be displayed. When the data arrives, if there are no items, an icon and text are shown to the user. If there are items, we show them.
Pagination UI Preview
Now that the data and UI layers are in place, we can already see a preview of our pagination UI:
This looks good, but we’re not done yet! 👇
Searching & Filtering
Pagination is rarely used only on its own. It is usually accompanied by search and filtering options in the form of query parameters assigned to the URL. In the example repo we are using the GitHub API.
The API documentation for the Search Repositories endpoint states that we can use the following query parameters:
-
q- query, the term we are searching -
sort- parameter by which we are sorting (stars, forks, watches …) -
order- order of the sorting (ascending or descending) -
per_page- number of items per page - handled by thePaginationController -
page- page - handled by thePaginationController
In order to filter by other properties like programming languages, the query parameter q is expanded with +<filter_name>:<filter_value> (e.g. for Dart programming language it would be +language:dart ).
To bring everything together, the API call could look like this:
GET https://api.github.com/search/repositories?q=flutter+language:dart&sort=stars&order=desc&page=1&per_page=10.
Given our query parameters and how to filter the API, we can create a filter class (freezed package is used here to generate the copyWith() method which will be used later):
@freezed
class RepositoryFilter with _$RepositoryFilter {
  const factory RepositoryFilter({
    String? query,
    @Default([]) List<ProgrammingLanguage> languages,
    SortOption? sort,
    OrderOption? order,
  }) = _RepositoryFilter;
}
Our subclasses are defined as follows:
Sort Option:
sealed class SortOption {
  const SortOption(this.value, this.label);

  final String value;
  final String label;
}

class StarsSort extends SortOption {
  const StarsSort() : super('stars', 'Stars');
}

class ForksSort extends SortOption {
  const ForksSort() : super('forks', 'Forks');
}

class UpdatedSort extends SortOption {
  const UpdatedSort() : super('updated', 'Updated');
}
Order Option:
sealed class OrderOption {
  const OrderOption(this.value, this.label);

  final String value;
  final String label;
}

class AscOrder extends OrderOption {
  const AscOrder() : super('asc', 'Ascending');
}

class DescOrder extends OrderOption {
  const DescOrder() : super('desc', 'Descending');
Programming Language:
sealed class ProgrammingLanguage {
  const ProgrammingLanguage(this.value, this.label);

  final String value;
  final String label;
}

class JavaLanguage extends ProgrammingLanguage {
  const JavaLanguage() : super('java', 'Java');
}

class PythonLanguage extends ProgrammingLanguage {
  const PythonLanguage() : super('python', 'Python');
}

// other languages ...
To control that filter we can create a Notifier which will have a method to update the properties of the filter. The FilterNotifier looks something like this:
class RepositoryFilterNotifier extends Notifier<RepositoryFilter> {
  @override
  RepositoryFilter build() => const RepositoryFilter();

  void updateQuery(String query) {
    state = state.copyWith(query: query);
  }

  void update(RepositoryFilter filter) {
    state = filter;
  }
}
There are multiple ways of structuring the notifier, but since in the example code it’s used by the search bar and the filter options bottom sheet, there are 2 methods defined: 1 for the search bar (the updateQuery() method) and one for the bottom sheet (the update()) method.
Let’s first see what the data layer is missing and then how to connect everything with the UI.
Data Layer
Filter and FilterNotifier are defined, but… who will listen to the filter changes? The answer is the class that can consume the filter and calls the API: RepositoriesViewModel.
Let’s think about it: What does the PaginationController miss to be able to apply the filter on every request?
The obvious answer is the current state of the filter. Since the filter can change very often, the class also needs to have a mechanism for getting the latest state of the filter.
There are multiple angles we can approach from here:
-
Create a new
Notifierwhich watches both theFilterNotifierand theRepositoriesViewModel -
Listen to changes of the
FilterNotifierin a Widget and then pass a copy toRepositoryViewModel -
Apply the changes inside the
RepositoriesViewModelwhen the filter changes
Each approach has its pros and cons:
-
Very clumsy solution, hard to debug, and not very readable
-
A good solution, very readable, and easy to spot bugs, but depends on the widget lifecycle and is error-prone due to the requirement of adding a
ref.listenmethod to every widget that uses this setup -
The least error-prone solution, requires more code and can be reused with a
mixin
I like to write code that makes understanding and debugging as easy as possible, so I’m choosing approach no.3.
Since sorting and filtering depend on the pagination, it only makes sense to create a contract so that only the classes that are using the PaginationController can sort and filter.
The first thing we need to define are the requirements for the consumer of the filter:
abstract class PaginationFilter<F> {
  late F currentFilter;

  Future<void> applyFilter(F filter);
}
The name PaginationFilter comes from the fact that you can sort and filter depending on the pagination. The class is parameterized with a generic parameter <F>, which represents the type of filter we are using.
There is only 1 parameter and 1 method defined. The currentFilter parameter is used to store the current state of the filter to facilitate the API calls and the applyFilter() method is used to apply the filter.
Applying the filter always looks the same:
-
save the filter value
-
reset pagination
-
load the first page of the filtered data
To reuse that, we can create a mixin:
mixin AsyncPaginationFilter<F, T, I> on AsyncPaginationController<T, I>
  implements PaginationFilter<F> {
  @override
  Future<void> applyFilter(F filter) async {
    currentPage = initialPage;
    currentFilter = filter;

    state = AsyncLoading<List<T>>();

    final newState = await AsyncValue.guard<List<T>>(() async {
      return await loadPage(currentPage);
    });
    state = newState;
  }
}
The mixin requires 3 parameters:
-
<F>- type of filter used -
<T>- type of data used -
<I>- type of index used for paging.
Since I’m using the approach no.3. this mixin can only be applied to a class that is using the AsyncPaginationController, which is RepositoriesViewModel.
The updated ViewModel now looks like this:
class RepositoriesViewModel extends AsyncNotifier<List<Repository>>
    with AsyncPaginationController<Repository, int>,
        AsyncPaginationFilter<RepositoryFilter, Repository, int> {
  GithubRepository get repository => ref.read(githubRepositoryProvider);

  @override
  int get initialPage => 1;

  @override
  FutureOr<List<Repository>> loadPage(int page) async {
    final (totalItems, items) = await repository.fetchRepositories(
        query: currentFilter.query ?? "",
        languages: currentFilter.languages,
        sort: currentFilter.sort,
        order: currentFilter.order,
        page: page);
    final previousLength = state.valueOrNull?.length ?? 0;
    _canLoadMore = previousLength + items.length < totalItems;
    return items;
  }

  @override
  int nextPage(int currentPage) => currentPage + 1;

  @override
  RepositoryFilter currentFilter = const RepositoryFilter();
}
You can only notice the subtle changes:
-
uses the new
AsyncPaginationFiltermixin -
used the
currentFiltervalue inloadPagemethod to apply the filter to every request -
provides a default
currentFiltervalue which doesn’t apply any filters
UI Layer
The UI layer now needs to use the RepositoryFilterNotifier and apply it with every change. The query will come from a search bar and the sorting and filter options can be applied from a bottom sheet.
Let’s create a widget which will contain a search bar and a button which opens the bottom sheet.
class SearchFilterRow extends ConsumerWidget {
  final Function(String) onSearch;
  final AlwaysAliveProviderBase<RepositoryFilter> filterProvider;
  final Function(RepositoryFilter) onFilterChanged;
}
SearchFilterRow accepts 3 parameters:
-
onSearch()callback which provides back the query for the filter -
filterProviderwhich is used to show the correct state of the filter -
onFilterChanged() callback which is used to update and apply the new filter state
Now we can add it to the Scaffold inside the CustomScrollView as a Silver:
return Scaffold(
      body: NotificationListener(
	      ...
        child: CustomScrollView(
          slivers: [
            SliverPadding(
              padding: const EdgeInsets.only(bottom: 16),
              sliver: SearchFilterRow(
                onSearch: onSearch,
                filterProvider: repositoryFilterNotifierProvider,
                onFilterChanged: (newFilter) {
                  filterController.update(newFilter);
                  applyFilter();
                },
              ),
            ),
            ...repositories(context, repositoriesState),
          ],
        ),
      ),
    );

void applyFilter() {
    viewModel.applyFilter(ref.read(repositoryFilterNotifierProvider));
}

void onSearch(String query) {
    filterController.updateQuery(query);
    applyFilter();
}
Since we are using the approach no.3. we need to update the filter when we change it, which happens inside the onSearch() method after updating the query and onFilterChanged() method after updating the filter.
Since we now have even more parts to this whole system, here’s a visual to represent how all of this works together:
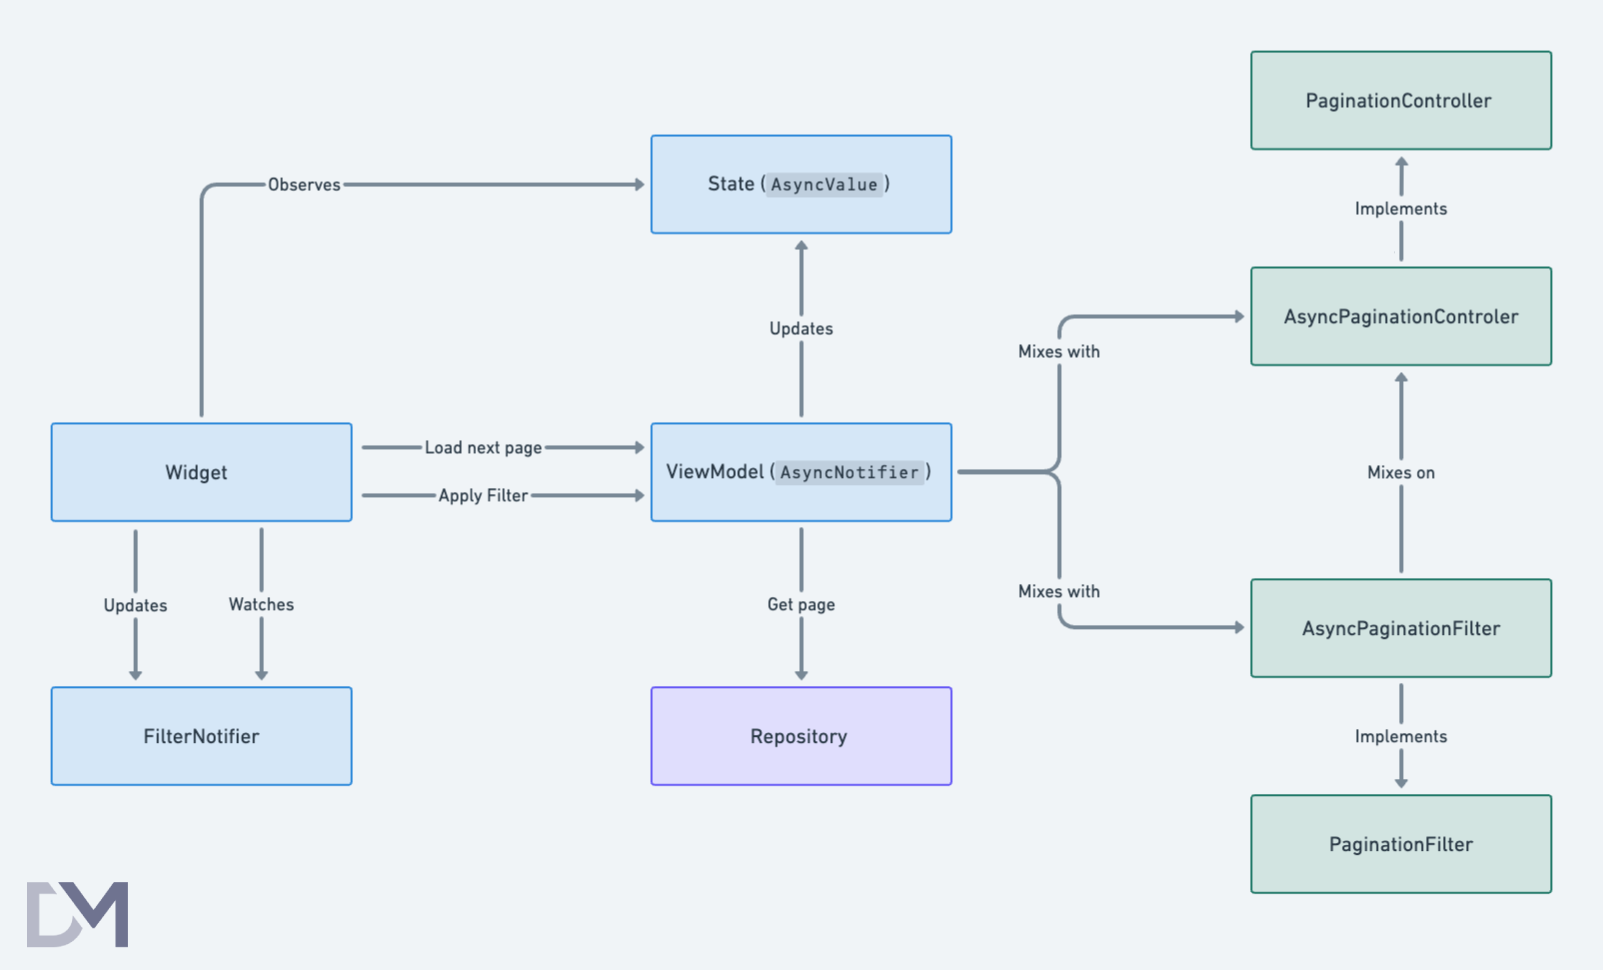
Looks scary, doesn’t it? It’s not that complicated. Let me explain.
Starting from the right side, we have PaginationController and PaginationFilter which are interfaces which define our mixins. Mixins implement the interfaces and are then applied to the ViewModel, which is an AsyncNotifier. They give him all the tools needed for pagination and filtering.
ViewModel uses Repository to call the API and updates the state, which is watched by the Widget. The Widget uses loadNextPage() and applyFilter() methods to update the state of the ViewModel according to user actions. FilterNotifier is used to update the current state of filters and Widget also watches it to be able to trigger applyFilter() when it changes.
That’s it! Read it one more time and follow the image to make sure you understand everything.
Bonus Section
Congratulations, you have just successfully implemented pagination, searching, sorting & filtering of a list that’s easy to scale and replicate in the rest of your app. Since you got here you might wonder, what’s the bonus?
It’s often the case that paginated data needs to be refreshed with swipe-to-refresh, so let’s see how to achieve that.
Firstly, we need to add a method to refresh the pagination to get the newest data and start from the beginning again. Note that this usually doesn’t reset the filters.
class RepositoriesViewModel extends ... {
  void refresh() {
    currentPage = initialPage;
    //currentFilter = const RepositoryFilter(); <- add this for filter reset
    applyFilter(currentFilter);
  }
}
The only thing left to do is to add a RefreshIndicator between the NotificationListener and the CustomScrollView which calls this method.
NotificationListener(
  onNotification: ...
  child: RefreshIndicator(
    onRefresh: () async {
      viewModel.refresh();
    },
    child: CustomScrollView
Here’s the final result:
Conclusion
In this tutorial, you have learned what pagination is, and how to abstract it and apply it to the AsyncNotifier. You also learned how to extend the pagination with sorting and filtering. Lastly, you learned how to implement a swipe-to-refresh for a fully functional experience.
Personally, I find the best part of this setup to be a clean separation of concerns, using composition over inheritance, and flexibility to support any type of pagination index and filters.
Try this setup on your next project and let me know how it went.
If you have found this useful, make sure to like and follow for more content like this. To know when the new articles are coming out, follow me on Twitter or LinkedIn.
Until next time, happy coding!